How Difficult Is It to Regrip Golf Clubs?
← Golf Equipment | Golf Clubs
BLOCKQUOTE_0
Quick Answer
- Regripping golf clubs yourself is a manageable DIY project.
- With the right tools and a bit of patience, most golfers can successfully regrip their clubs.
- It’s a solid way to save some cash and keep your clubs feeling fresh.
Who This Is For
- Golfers whose grips are slick, worn, or just feel off.
- Anyone looking to dial in the feel of their clubs without paying pro shop prices.
- DIY enthusiasts who like getting their hands dirty and saving a buck.
What to Check First
- Grip Type: Know what size (standard, midsize, jumbo) and style of grip you want. It makes a difference in your swing feel.
- Quantity: Count your clubs. You’ll need one grip per club, plus maybe an extra just in case. Don’t forget your putter!
- Workspace: Find a spot with decent airflow. You’ll be using some chemicals, and nobody likes that chemical smell lingering.
- Tools: Make sure you’ve got the essential gear ready to go. A quick inventory saves headaches later.
- New Grips: Ensure the new grips are compatible with the solvent you plan to use. Some materials react differently.
Step-by-Step Plan: Regripping Golf Clubs
1. Secure the Club: Clamp the club shaft firmly in a vise, using a shaft clamp. What to look for: A grip that’s held tight but the shaft isn’t getting crushed. The clamp should distribute pressure. Mistake to avoid: Overtightening the vise clamp, which can easily flatten or crack your golf club shafts, especially if they’re graphite. I learned that the hard way once, and it cost me a shaft.
2. Slice Off the Old Grip: Use a sharp utility knife to cut along the length of the old grip, starting from the butt end and working your way down. What to look for: The grip peeling away cleanly from the shaft. Mistake to avoid: Cutting too deep and nicking the shaft itself. This is crucial with graphite shafts; a small gouge can lead to a weak spot and potential breakage.
3. Scrape Off Old Tape Residue: Get rid of all the old grip tape residue from the shaft. You might need a solvent or a scraper for this. What to look for: A completely smooth, clean shaft surface. No sticky bits allowed. Mistake to avoid: Leaving bits of old tape behind. This will create an uneven surface, resulting in a lumpy, uncomfortable new grip that feels off-center.
4. Apply New Grip Tape: Wrap new double-sided grip tape around the shaft. Start from the butt end and overlap the tape by about half its width as you spiral down. What to look for: Smooth, even tape coverage with no wrinkles or air bubbles. Ensure the end of the tape is securely stuck down. Mistake to avoid: Applying the tape unevenly, leaving gaps, or not overlapping enough. This can cause the grip to twist during your swing or not adhere properly.
5. Apply Solvent and Install New Grip: Generously douse the inside of the new grip with grip solvent. Also, apply some solvent to the grip tape on the shaft. Quickly slide the grip onto the shaft, ensuring it’s straight and fully seated. What to look for: The grip sliding on smoothly and easily, allowing you to position it perfectly. It should seat all the way down to the butt end. Mistake to avoid: Not using enough solvent. This makes it incredibly difficult to get the grip on without tearing it or creating air bubbles. Also, avoid using the wrong type of solvent, which can damage the grip material.
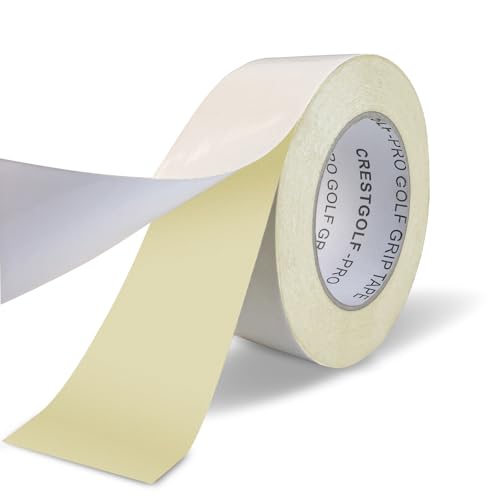 Crestgolf Golf Grip Tape Roll 2" x 18 Yards, Premium Solvent Activated Double Sided Adhesive Strips for Regripping Golf Clubs, Upgrade 1.2U Thickened Double Sided TapeCheck price on AmazonWe may earn a commission
6. Align and Dry the Grip: Make sure the grip is perfectly aligned with the clubface (parallel to the shaft) and let it dry completely according to the manufacturer’s instructions. This usually takes a few hours, but some solvents need 24 hours for full cure. What to look for: The grip sticking firmly to the shaft and staying put. It shouldn’t feel loose or slide around. Mistake to avoid: Rushing the drying process. Installing a grip before the solvent has fully evaporated can lead to a loose grip that might twist or even come off during a swing. Patience here is key.
How Difficult Is It to Regrip Golf Clubs?
So, how hard is it to regrip golf clubs? Honestly, it’s a moderately challenging DIY project. It’s not brain surgery, but it does require a steady hand, some attention to detail, and the right technique. If you can handle basic tools and follow instructions, you can definitely tackle this. The biggest hurdle for most folks is just getting over the initial hesitation and gathering the necessary supplies.
Once you’ve got your workspace set up and your tools laid out, the process becomes much less intimidating. Most golfers find that after they’ve regripped their first club, the subsequent ones go significantly faster. You get into a rhythm, and you start to feel more confident with each club you complete. It’s a very rewarding feeling to know you’ve improved your clubs yourself.
The time commitment can vary. For a beginner, you might spend 15 to 30 minutes per club. That means a full set of 14 clubs could take anywhere from 3.5 to 7 hours. However, as you gain experience, this time drops dramatically. Seasoned DIYers can often regrip a full set in just a couple of hours. The cost savings compared to having them done at a pro shop or club repair facility are substantial, making it a worthwhile endeavor for many.
Troubleshooting Common Golf Club Regripping Issues
When you’re diving into regripping, you might run into a few snags. Don’t sweat it; most issues are easily fixed with a little know-how.
- Air Bubbles in the Grip: Sometimes, you’ll notice a small air bubble trapped under the grip. Why it matters: This can create a soft spot and affect the feel of the grip. Fix: Gently try to work the bubble towards the butt end of the grip with your thumb. If it’s stubborn, you might need to carefully puncture it with a fine needle and then press the air out.
- Grip Not Sliding On Easily: If the grip is fighting you and not sliding down the shaft, it’s usually due to insufficient solvent or the tape drying out too quickly. Why it matters: Forcing it can damage the grip or create tears. Fix: Add more solvent to the inside of the grip and the shaft. Work the grip back and forth gently to help it slide. Make sure your tape is still moist with solvent.
- Grip Twisting After Installation: This is a common and frustrating problem. It usually happens if the tape wasn’t applied evenly or if the grip wasn’t installed straight. Why it matters: A twisted grip feels awkward and can negatively impact your swing. Fix: If the grip is still wet, you can often gently twist it back into alignment. If it’s already dried, you might have to remove it (using more solvent) and reinstall it, paying close attention to alignment.
- Grip Feels Too Thick or Too Thin: This is usually a matter of choosing the wrong grip size or adding extra wraps of tape. Why it matters: Grip size is crucial for comfort and control. Fix: For a slightly thicker feel, you can add extra layers of grip tape (one extra layer is roughly equivalent to a midsize grip on a standard shaft). For a thinner feel, ensure you’re only using the standard single layer of tape.
Common Mistakes to Avoid When Regripping
Let’s talk about what can go wrong. Avoiding these common pitfalls will save you time, frustration, and maybe even a few bucks.
- Using the Wrong Solvent — Some household cleaners or mineral spirits can damage the rubber or urethane compounds in modern grips, or they might not allow the tape to adhere properly. This can lead to grips that feel sticky, degrade quickly, or peel off. — Stick to specialized golf grip solvent. It’s formulated to work with grip tape and a wide range of grip materials without causing damage, and it evaporates cleanly.
- Not Removing All Old Grip Tape — Leaving behind old, gummy tape creates an uneven surface on the shaft. This results in a grip that feels bumpy, has soft spots, and doesn’t sit flush against the shaft, leading to an uncomfortable feel and potentially affecting your grip pressure. — Scrape thoroughly until the shaft is completely smooth. If the old tape is exceptionally stubborn, you might need a stronger solvent or even consider re-taping the entire area with new grip tape to ensure a perfectly smooth foundation.
- Applying Grip Tape Unevenly — Wrinkled tape, gaps, or inconsistent overlap means the new grip won’t have a uniform surface to adhere to. This creates an uncomfortable feel in your hands and significantly increases the chances of the grip twisting during your swing or even coming loose. — Apply the tape smoothly and deliberately, ensuring a consistent overlap of about half the tape’s width. Run your finger along the tape as you apply it to smooth out any potential wrinkles or air pockets.
- Not Using Enough Solvent — When the inside of the grip and the tape on the shaft aren’t sufficiently lubricated, the grip becomes very difficult to slide on. This can lead to tearing the grip, creating air bubbles, or not getting the grip fully seated on the shaft. — Be generous with the solvent. You want the inside of the grip and the taped area to be thoroughly wet. It should feel slippery. The solvent evaporates quickly, so have your grip ready to slide on immediately after applying it.
- Overtightening the Vise Clamp — This is a big one, especially with graphite shafts. Clamping down too hard can easily crush, dent, or even crack the shaft, rendering it useless. — Use a proper shaft clamp designed for golf clubs. Snug it up firmly enough to hold the club securely, but do not crank on it. You should feel resistance, but you shouldn’t be straining to tighten it. The clamp should distribute pressure evenly.
- Not Aligning the Grip Properly — It’s easy to get caught up in just getting the grip on and forget about alignment. A crooked grip looks bad and feels worse. — Before fully seating the grip, take a moment to align the logo or pattern on the grip so it’s perfectly straight relative to the clubface. A good visual cue is to ensure the grip runs parallel to the shaft and the clubface is square.
- Reusing Old Grip Tape — While tempting to save a few bucks, old tape has lost its tackiness and adhesion properties. — Always use fresh, double-sided golf grip tape for every regrip job. It’s inexpensive and ensures a secure, long-lasting bond for your new grips.
FAQ
- What tools are absolutely essential for regripping golf clubs?
You’ll absolutely need a vise with a shaft clamp, a sharp utility knife, double-sided golf grip tape, grip solvent, and of course, your new grips. A tape remover or scraper can also be very helpful for cleaning off old residue.
- How long does it typically take to regrip a set of golf clubs?
For a beginner tackling their first set, expect to spend about 15-30 minutes per club. This includes setup, removal, prep, and installation. Once you get the hang of it and find your groove, you can likely regrip a full set of 14 clubs in 2-3 hours.
- Can I use a hairdryer to speed up the drying process of new grips?
It’s generally not recommended. The heat from a hairdryer can sometimes damage the rubber or urethane compound of the grip, potentially weakening it or affecting how it adheres to the shaft. It’s best to let them air dry naturally, which typically takes a few hours, or as specified by the solvent manufacturer.
- How do I know when my golf grips need replacing?
The most obvious signs are when they feel hard, slick, or cracked. If you find yourself constantly adjusting your grip during your swing, or if your hands feel like they’re slipping, it’s definitely time for a change. Visible wear patterns are also a dead giveaway.
- Can I regrip just one club, or should I do them all?
You can certainly regrip individual clubs as needed. However, if several of your grips are showing signs of wear, it’s often best to regrip them all at once. This ensures consistency in feel and performance across your entire set of clubs, which can be beneficial for your game.
- What’s the best way to store golf clubs after regripping?
After regripping and allowing them to dry fully, store your clubs in a cool, dry place away from direct sunlight or extreme temperatures. Avoid leaning them against a wall in a way that puts pressure on the grips. A golf bag is ideal for storage.
- Can I regrip my putter grip myself?
Absolutely! Putter grips are regripped using the exact same process as your iron and wood grips. The same tools and techniques apply, though putter grips can sometimes be a bit thicker, which might require a little more solvent to get them on smoothly.

Michael Reeves is a PGA Professional with over 20 years of experience in competitive golf and instruction. A former Division I collegiate player at the University of Texas, he competed on the mini-tours before transitioning to full-time coaching and golf journalism. He has been a certified PGA teaching professional since 2005 and has worked with players at every level, from absolute beginners to collegiate champions.
His writing has appeared in Golf Digest, Golf Magazine, and The Left Rough. At GolfHubz, Michael leads the editorial team, overseeing fact-checking and ensuring every answer meets the same standard he demands on the lesson tee: clear, evidence-based, and immediately useful.
When he’s not writing or teaching, Michael plays to a +1.4 handicap at his home club in Austin, Texas. He has attended over 40 major championships as a journalist and fan, and has played more than 200 courses across 15 countries.
You can reach Michael at [email protected] or follow his occasional swing analysis posts on the site.