Titleist SureFit Hosel Guide: Settings Chart
The Titleist SureFit hosel is an adjustable sleeve system that lets you change loft and lie independently. Unlike simple loft sleeves that only tweak one variable, SureFit uses a two-ring system (a top ring and a bottom ring) to give you 16 distinct settings. This guide breaks down the chart, what each letter and number means, and how to find the setting that fits your swing.

How the Two-Ring System Works
The SureFit hosel has two adjustable rings, each with four positions. The top ring controls loft. The bottom ring controls lie. Together, they create the 16-setting matrix.
- Top ring settings: A1, A2, A3, A4, B1, B2, B3, B4, C1, C2, C3, C4, D1, D2, D3, D4
- Bottom ring positions: 1, 2, 3, 4 (each corresponds to a lie angle)
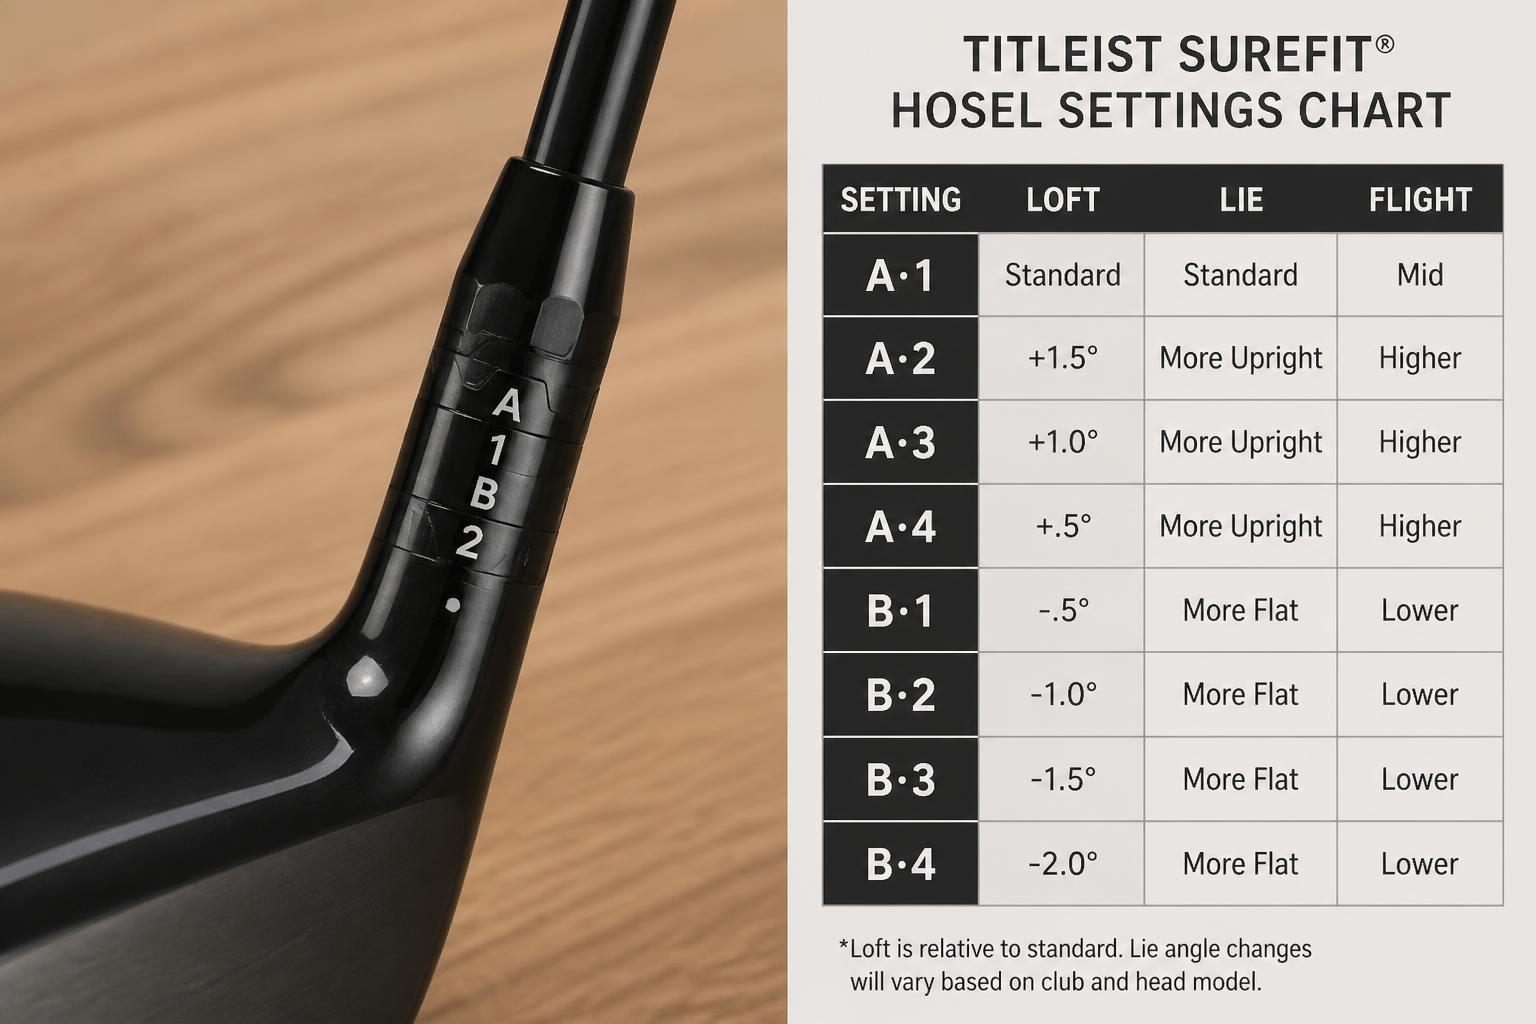
The letters (A, B, C, D) are the loft positions. The numbers (1, 2, 3, 4) are the lie positions. You set the top ring to a letter and the bottom ring to a number, then lock the screw.
Titleist SureFit Hosel Settings Chart
| Setting | Loft Change | Lie Change |
|---|---|---|
| A1 | Standard loft | Standard lie |
| A2 | Standard loft | 0.75° upright |
| A3 | Standard loft | 1.5° upright |
| A4 | Standard loft | 0.75° flat |
| B1 | +0.75° loft | Standard lie |
| B2 | +0.75° loft | 0.75° upright |
| B3 | +0.75° loft | 1.5° upright |
| B4 | +0.75° loft | 0.75° flat |
| C1 | −0.75° loft | Standard lie |
| C2 | −0.75° loft | 0.75° upright |
| C3 | −0.75° loft | 1.5° upright |
| C4 | −0.75° loft | 0.75° flat |
| D1 | −1.5° loft | Standard lie |
| D2 | −1.5° loft | 0.75° upright |
| D3 | −1.5° loft | 1.5° upright |
| D4 | −1.5° loft | 0.75° flat |
Note: The standard loft and lie vary by club model. For example, a TSR3 driver at A1 is 9.0° loft with a 58.5° lie. A TSR2 at A1 is 10.0° with the same lie. Always check your specific model’s spec sheet for the base numbers.
What Does the B1 Setting Mean?
The B1 setting adds 0.75° of loft while keeping the lie at standard. If your driver is 9.0° at A1, B1 makes it play at 9.75°.
This is a common setting for golfers who want a slightly higher launch without changing the lie angle. It’s also useful if you’re between driver lofts and want to split the difference rather than buying a new head.
Does SureFit Affect Ball Flight?
Yes, but the effect is more about launch conditions than curve. The SureFit hosel does not create draw or fade bias like some adjustable weights do. It changes:
- Launch angle: More loft (B settings) raises launch; less loft (C and D settings) lowers it.
- Lie angle: Upright lie settings (position 2 and 3) can help with a fade bias because the toe sits higher at impact. Flat settings (position 4) can help with a draw bias because the toe sits lower.
The lie change is subtle—0.75° increments—but it can influence direction consistency. If you tend to hit pushes or fades, an upright setting may help square the face. If you hit hooks, a flatter setting may help.
How to Adjust the Titleist SureFit Hosel
You need a Torx T25 wrench (included with the club) and about two minutes.
1. Loosen the screw at the sole of the club with the T25 wrench. Turn counterclockwise until the head is free.
2. Pull the head off the shaft. The shaft sleeve stays attached to the shaft.
3. Set the top ring to your desired letter (A, B, C, or D). The letter should align with the indicator arrow on the sleeve.
4. Set the bottom ring to your desired number (1, 2, 3, or 4). Align it with the same arrow.
5. Reattach the head and hand-tighten the screw.
6. Torque the screw to 40 in-lb (4.5 Nm). Do not overtighten—you can strip the threads.
Common mistake: Forgetting to align both rings to the same arrow. If the top ring is at B and the bottom ring is at 2, but they’re not aligned to the same reference point, you’ll get an unintended setting.
What to Check After Your First Adjustment
After you set a new loft or lie, hit a few balls before deciding whether it worked. If you changed from A1 to B1 to add loft, you should see a slightly higher launch within the first several shots. If the ball flight looks identical to before, double-check that both rings are aligned to the same arrow—it’s easy to set the top ring correctly and bump the bottom ring out of position while reattaching the head. If the setting is correct but the flight hasn’t changed, the issue may not be loft; it could be your shaft profile or swing path, and no hosel setting will fix that.
When to Stop and Get Help
If you feel resistance while loosening or tightening the screw, or if the head doesn’t seat flush against the sleeve, stop immediately. A cross-threaded screw or a damaged sleeve can ruin the club’s connection point, and forcing it will make the repair more expensive. Also stop if the screw spins freely without catching—that’s a sign the threads are stripped. In either case, take the club to a qualified club fitter or contact Titleist customer service. Do not keep adjusting a hosel that isn’t seating properly.
How to Choose the Right Setting for Your Swing
There’s no single “best” setting—it depends on your launch numbers and ball flight tendencies. Use this decision framework:
| If you see this… | Try this… |
|---|---|
| Launch too low, ball runs out | B1 or B2 (add loft) |
| Launch too high, ballooning | C1 or D1 (reduce loft) |
| Fades that don’t come back | A2 or B2 (upright lie) |
| Hooks that start left | A4 or C4 (flat lie) |
| Solid contact, want fine-tuning | Change only one variable at a time |
A practical approach: Start at A1 (standard). Hit 10 shots and note launch angle and direction. Change only one variable—either loft or lie—and hit 10 more. Compare. Changing both at once makes it harder to know which adjustment worked.
How to Verify the Change Actually Worked
After you switch settings, confirm the adjustment took effect before committing to it. Hit 10 balls with the new setting and compare them to your baseline. For a loft change, look for a visible difference in trajectory height—about 0.75° of loft typically produces a noticeable but modest change in apex height. For a lie change, watch the start line: an upright setting should reduce the amount of fade or push you see on your misses. If after 10 shots you see no difference in either launch or direction, revert to your previous setting and try a different variable. The SureFit system is mechanical and precise, so if the setting is correct, the change will show up in your ball flight.
Aftermarket SureFit Adapters
If you’re building a custom shaft, you don’t need to buy a new driver head. Aftermarket adapters fit the same SureFit system and use the same settings chart. One option is the Gchee .335 Tip Golf Shaft Adapter for Titleist TSR Driver, which includes the ferrule, washer, and anti-strip screw in one kit.
Another is the QUEEN3C Golf Shaft Adapter for Titleist GTS, GT & TSR Driver, RH/LH .335″, which fits the GTS, GT, TSR, TSi, TS, 917, 915, 913, and 910 series. One sleeve fits both right- and left-handed heads, so you don’t need to match a separate part.
For older models, the Gofotu .335 Adapter Sleeve W/Serial Compatible with Titleist GT2,GT3,GT4,TS1,TS2,TS3,TS4,917/915/913D, Driver covers the GT, TS, and 917/915/913 lines. It’s made from aircraft-grade titanium and is compatible with both right- and left-handed heads.
Note: Aftermarket adapters use the same A/B/C/D and 1/2/3/4 system, so the chart above applies. However, quality varies between brands—stick with machined adapters and avoid cast ones if you’re installing a heavy shaft.
Common Mistakes to Avoid
- Overtightening the screw. The spec is 40 in-lb. If you don’t have a torque wrench, snug it firmly—don’t crank it.
- Ignoring the lie setting. Many golfers only adjust loft and leave the bottom ring at 1. The lie adjustment is a free way to address direction issues.
- Changing two variables at once. If you go from A1 to B3, you’ve changed both loft and lie. You won’t know which one helped.
- Assuming the chart is the same across models. The SureFit system is consistent, but the base loft and lie differ. A TSR4 at A1 is 8.0°; a TSR2 at A1 is 10.0°. The settings shift from those baselines.
FAQ
How do I know which setting in my SureFit hosel is best for me?
Start at A1 and hit balls to establish a baseline. If your launch is too low, move to B1 to add 0.75° of loft. If your ball fades too much, try A2 for an upright lie. Change one variable at a time and compare results. If you have access to a launch monitor, use it to check launch angle, spin, and face angle before and after each change.
How to adjust the Titleist SureFit hosel?
Loosen the Torx T25 screw on the sole, pull the head off, set the top ring to a letter and the bottom ring to a number, reattach the head, and torque the screw to 40 in-lb. Both rings must align with the same indicator arrow on the sleeve.
What does the B1 setting on a Titleist SureFit driver mean?
B1 adds 0.75° of loft while keeping the lie at standard. For a 9.0° driver, B1 makes it play at 9.75°. It’s a middle-ground setting for golfers who want slightly more launch without changing lie angle.
Does SureFit affect ball flight?
Yes. Loft settings change launch angle—more loft raises it, less loft lowers it. Lie settings influence direction: upright positions can reduce fades, flat positions can reduce hooks. The changes are subtle (0.75° increments) but measurable over multiple shots.

Michael Reeves is a PGA Professional with over 20 years of experience in competitive golf and instruction. A former Division I collegiate player at the University of Texas, he competed on the mini-tours before transitioning to full-time coaching and golf journalism. He has been a certified PGA teaching professional since 2005 and has worked with players at every level, from absolute beginners to collegiate champions.
His writing has appeared in Golf Digest, Golf Magazine, and The Left Rough. At GolfHubz, Michael leads the editorial team, overseeing fact-checking and ensuring every answer meets the same standard he demands on the lesson tee: clear, evidence-based, and immediately useful.
When he’s not writing or teaching, Michael plays to a +1.4 handicap at his home club in Austin, Texas. He has attended over 40 major championships as a journalist and fan, and has played more than 200 courses across 15 countries.
You can reach Michael at [email protected] or follow his occasional swing analysis posts on the site.