How to Replace Golf Club Grips: Step-by-Step Guide
← Golf Equipment | Golf Clubs
BLOCKQUOTE_0
Quick Answer
- Prep work is key: get that old grip off clean and secure the club right.
- Use the right tape and plenty of solvent; this makes the new grip slide on smooth.
- Line ’em up straight. Seriously. It matters for your swing.
Who This Guide Is For
- You, if you’re tired of paying pro shop prices for grip jobs. Save some dough.
- Anyone who wants their clubs to feel just right. New grips can totally change the game.
What to Check First When Replacing Golf Club Grips
- Grip Size: Are you going standard, midsize, or something else? Don’t guess. Check what you have now and what you want.
- Supplies: Got your grip solvent (mineral spirits work great) and double-sided grip tape? Make sure it’s the good stuff made for grips.
- Shaft Material: Steel or graphite? Graphite is softer, so you gotta be gentler with it.
- Club Condition: Give the shaft a once-over for any cracks or damage before you start. You don’t want to fix a grip and break a club, right? That’s a real bummer.
- New Grips: Make sure you have the correct number and type of grips for your clubs. Putter grips are usually different, so double-check.
Step-by-Step Plan for Replacing Golf Club Grips
Alright, let’s get these clubs feeling fresh. It’s not rocket science, but you gotta be methodical. This is how you get a solid grip job done, every time.
1. Secure the Club: Clamp the club shaft firmly in a vise, using a rubber shaft clamp to protect it. This is non-negotiable.
- What to look for: The clamp should grip the shaft without deforming it. It should hold steady, no wobble. You want it solid but not squeezed like a stress ball.
- Mistake to avoid: Squeezing the vise too hard. You’ll crack a graphite shaft or dent a steel one. Easy does it, man. A little pressure goes a long way.
2. Remove the Old Grip: Get that old grip off. You can slice it off with a utility knife or carefully peel it away. If it’s really stuck, a little heat from a hairdryer (used cautiously) can sometimes help, but cutting is usually faster.
- What to look for: Every last bit of the old grip and its tape needs to be gone. No nubs, no sticky patches.
- Mistake to avoid: Leaving behind old tape residue. This is a prime spot for the new grip to slip later on, and trust me, that’s a terrible feeling mid-swing.
3. Clean the Shaft Thoroughly: Grab a clean rag and some grip solvent (or mineral spirits) and wipe down the shaft until it’s spotless. You’re aiming for a smooth, clean surface.
- What to look for: A clean, smooth surface. No stickiness, no fuzz, no old adhesive. It should feel slick but clean.
- Mistake to avoid: Not getting it completely clean. Any gunk will mess with the new grip’s adhesion. It’s like trying to stick a sticker on a greasy surface – it just won’t hold.
4. Apply New Grip Tape: Wrap double-sided grip tape around the shaft. Start at the butt end and overlap each spiral by about a third of the tape’s width as you go down towards the clubhead. You want full coverage where the grip will sit.
- What to look for: The tape should be smooth and cover the shaft area where the grip will sit. Make sure the end of the tape is tucked in or cut cleanly.
- Mistake to avoid: Using regular masking tape or electrical tape. It won’t hold up to the solvent and might wrinkle or peel. Get grip-specific tape; it’s designed for this job and works like a charm.
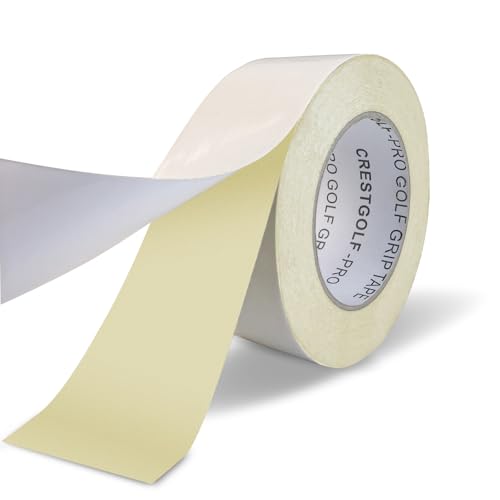 Crestgolf Golf Grip Tape Roll 2" x 18 Yards, Premium Solvent Activated Double Sided Adhesive Strips for Regripping Golf Clubs, Upgrade 1.2U Thickened Double Sided TapeCheck price on AmazonWe may earn a commission
5. Add Plenty of Solvent: This is crucial. Douse the inside of the new grip with plenty of grip solvent. Don’t be shy here; you need it to be well-lubricated for the grip to slide on easily. You want solvent dripping out the butt end.
- What to look for: Solvent dripping out the butt end of the grip. You need it to be well-lubed inside. If it looks dry, add more.
- Mistake to avoid: Not using enough solvent. This is the number one reason grips get stuck halfway and tear, or you end up wrestling with it for ages. More solvent equals easier install.
6. Slide on the New Grip: With the shaft taped and the grip full of solvent, push the grip onto the solvent-coated shaft. Start from the butt end and work your way down. It should slide on with minimal resistance.
- What to look for: The grip slides on easily. You should be able to twist it slightly to get the alignment perfect. If it feels like it’s catching, add more solvent.
- Mistake to avoid: Forcing it. If it’s not sliding smoothly, stop and add more solvent. Forcing it can tear the grip or push the tape out of place.
7. Align and Position: Once the grip is fully on, you’ll want to align it properly. Check the logo or any pattern on the grip and make sure it’s straight and where you want it for your hands. You can usually give it a little twist to get it just right.
- What to look for: The grip is straight and feels secure. There shouldn’t be any visible air bubbles trapped under the grip.
- Mistake to avoid: Rushing the drying process. Give the grips at least a few hours to dry completely. Overnight is even better. I usually do mine before bed so they’re ready to go in the morning. This allows the solvent to evaporate and the tape to bond securely.
8. Let Them Dry: Now comes the hardest part: waiting. Let the clubs sit undisturbed until the grips are fully dry and bonded to the shaft. This usually takes several hours, but it’s worth the wait.
- What to look for: The grips feel firm and secure. They shouldn’t feel tacky or loose.
- Mistake to avoid: Putting the clubs back in play too soon. If the solvent hasn’t fully evaporated, the grips might feel loose or slip when you swing. Patience, grasshopper.
How to Replace Golf Club Grips: A Step-by-Step Guide
Replacing your own golf club grips is a rewarding skill that saves you cash and lets you dial in your club setup. It’s not complicated, but doing it right means paying attention to the details. This guide covers the essentials to get you rolling.
When you’re looking at Replacing Golf Club Grips, the process breaks down into a few key phases: preparation, installation, and drying. Each has its own little tricks to make sure you end up with a professional-feeling grip.
Preparation is Paramount
Before you even think about putting a new grip on, you’ve got to get the club ready. This means stripping off the old grip and cleaning the shaft meticulously.
- Removing Old Grips: This is usually the messiest part. You can cut them off with a sharp utility knife. Be careful not to cut into the shaft itself, especially if it’s graphite. Sometimes, you can peel them off if they’re old and brittle. If they’re really stuck, a little heat from a hairdryer can help soften the rubber, but again, be cautious with graphite.
- Scraping Off Old Tape: Once the grip is off, you’ll find double-sided tape residue on the shaft. This is the enemy of good adhesion. Use a scraper (a plastic one is safer for graphite) or even the edge of your utility knife (carefully!) to remove every last bit of this sticky stuff.
- Cleaning the Shaft: After scraping, wipe the shaft down with a clean rag and some mineral spirits or grip solvent. This removes any remaining adhesive, oils, or dirt. You want a perfectly smooth, clean surface for the new tape and grip to adhere to.
Installation: The Heart of the Matter
This is where the magic happens. Getting the tape and solvent just right is key to a smooth installation.
- Applying the Grip Tape: Use double-sided grip tape specifically designed for golf clubs. Wrap it around the shaft, starting from the butt end and overlapping each turn by about one-third. Make sure the tape goes all the way down to the bottom of where the grip will end. Smooth it out so there are no wrinkles or air pockets.
- The Solvent Soak: This is the secret sauce. Pour a generous amount of grip solvent into the new grip. You want it to flood the inside. Cap the butt end of the grip with your finger and shake it around to coat the entire interior surface. You should see solvent start to drip out the bottom.
- Sliding On the Grip: Quickly, but carefully, slide the solvent-soaked grip onto the taped shaft. It should glide on with very little effort. If it starts to stick or feel resistant, stop and add more solvent. You can rotate the grip slightly to ensure perfect alignment. Getting the logo or any alignment aids facing the direction you want is important for consistency.
Drying and Finishing Touches
Once the grip is on and aligned, you just need to let it dry.
- Alignment Check: Before the solvent fully evaporates, give the grip a final check to make sure it’s perfectly straight.
- Drying Time: Let the club sit undisturbed for at least a few hours, preferably overnight. This allows the solvent to evaporate completely and the grip to bond securely to the tape and shaft. Avoid the temptation to speed this up with heat, as it can damage the grip material.
Common Mistakes in Replacing Golf Club Grips
- Mistake: Not cleaning the shaft thoroughly
- Why it matters: Old residue prevents proper adhesion of the new grip, leading to slippage during your swing. That’s a recipe for a bad shot.
- Fix: Scrape and wipe the shaft until it’s completely clean and smooth. Seriously, get it shiny. A clean surface is everything.
- Mistake: Using the wrong type of tape
- Why it matters: Standard tapes may not adhere well with grip solvent and can wrinkle or peel, compromising the grip’s hold.
- Fix: Use double-sided grip-specific tape. It’s designed to work with the solvent and create a strong, lasting bond.
- Mistake: Insufficient solvent
- Why it matters: Makes it difficult to slide the grip on, potentially causing tears in the grip or forcing you to wrestle it into place, which rarely ends well.
- Fix: Ensure enough solvent is used to coat the inside of the grip generously. Let it drip out the end. More solvent equals easier installation.
- Mistake: Overtightening the vise
- Why it matters: Can easily damage the club shaft, especially graphite, leading to cracks or breaks. Nobody wants to buy a new club because of a grip job.
- Fix: Use a rubber shaft clamp and tighten the vise just enough to hold the club steady without crushing it. Gentle pressure is key.
- Mistake: Poor grip alignment
- Why it matters: An off-center grip will affect your hand position and swing consistency, leading to errant shots. It just feels wrong.
- Fix: Take your time to visually align the grip’s logo or pattern before the solvent fully dries. A little adjustment now saves a lot of frustration later.
- Mistake: Not letting the grips dry completely
- Why it matters: If the solvent hasn’t evaporated, the grip may feel loose or even spin on the shaft during your swing.
- Fix: Be patient. Let the grips air dry for at least several hours, or preferably overnight, before using the clubs.
FAQ on Replacing Golf Club Grips
- How often should I replace my golf club grips?
Most golfers should look at replacing grips every 30-40 rounds, or about once a year. If they feel slick, worn, or start to crack, it’s definitely time for a change.
- What are the different types of golf grips available?
You’ve got your standard rubber grips, synthetic grips, corded grips for extra traction, and even some fancy gel-infused or oversized options. They vary in feel, tackiness, and durability. Putter grips are usually a bit thicker to help with feel and control.
- Can I use a hairdryer to speed up the drying process?
It’s best not to. Excessive heat can damage some grip materials or weaken the adhesive bond of the tape. Just let them air dry naturally. Patience is a virtue, even in golf club repair.
- How do I know if I need a different grip size?
If your hands feel cramped on the club, like your fingers are overlapping too much, you might need a larger size grip or to add more tape wraps. If your hands feel like they’re sliding around and you have too much space between your fingers, you might need a smaller grip or fewer tape wraps.
- Do I need a special vise for this?
A standard vise with a rubber shaft clamp is all you really need. The shaft clamp is crucial to prevent damaging the club shaft. Don’t clamp the club directly in the metal jaws of the vise; that’s a quick way to ruin a club.
- Can I reuse my old grips?
Generally, no. Once they’re off, they’re usually stretched out, distorted, and have lost their original tackiness and shape. It’s best to start fresh with new grips for optimal performance and feel.
- How long does it take to replace one grip?
Once you’ve got the hang of it and all your supplies are ready, you can probably do one grip in about 10-15 minutes, not including drying time. Replacing a whole set of 14 clubs will take a good chunk of an afternoon, but it’s a satisfying project.
- What kind of solvent should I use?
Grip solvent is specifically designed for this purpose. However, mineral spirits are a very common and effective alternative that you can find at most hardware stores. Just make sure it’s a solvent that evaporates cleanly.
- Can I use talcum powder instead of solvent?
While some people use talcum powder for installation, it’s generally not recommended for long-term adhesion. Solvent is the professional method because it lubricates the grip for easy installation and then evaporates, allowing the tape and grip to bond securely. Talcum powder can leave residue and may not create as strong a bond.
- What if the grip is too tight to slide on even with solvent?
First, try adding more solvent. Make sure it’s really saturating the inside. If it’s still fighting you, you might need to remove the grip, check the tape for any bunching or issues, and reapply more solvent. Sometimes, a slight twist or wiggle can help it seat properly.
- How do I grip the club when I’m installing?
You’ll be holding the club from the butt end, usually with your non-dominant hand, while sliding the grip on with your dominant hand. It’s a bit of a dance, but you’ll get the feel for it.
- Should I add extra wraps of tape for a thicker feel?
Absolutely. If you want a slightly thicker grip, you can add one or two extra layers of tape before applying the grip. This is a common way golfers customize the feel of their clubs without buying oversized grips. Just remember to still use enough solvent.
- How do I know if my grips are worn out?
Look for signs like shiny, slick surfaces, visible wear marks, cracks, or if the grip feels mushy or doesn’t spring back when squeezed. If you’re losing feel or the club is slipping in your hands, it’s time for new grips.
- Can I do this in my garage or kitchen?
Sure, but the garage is usually better. Grip solvent has fumes, so good ventilation is a must. Plus, it can get a little messy with the solvent dripping, so a surface you don’t mind getting a little grubby is ideal.
- What are the benefits of replacing grips myself?
Saving money is the big one. You can also customize the feel and performance of your clubs by choosing different grip types and sizes. Plus, there’s a real satisfaction in knowing you can maintain your own equipment.
- How do I dispose of old grips and tape?
Old rubber grips can usually go in your regular household trash. Check with your local waste management for specific guidelines.
- Can I replace putter grips the same way?
Yes, the process is essentially the same, though putter grips are often larger and might require a bit more solvent and effort to slide on. Just ensure you have the right size putter grip tape.
- What’s the deal with “air-free” grips?
Some newer grips are designed to be installed without solvent. They often use a different type of adhesive or installation method. Always follow the manufacturer’s specific instructions for these types of grips.
- Is there a way to check the grip’s alignment after it’s dried?
If you think it’s slightly off after drying, you can try carefully removing it with more solvent and re-installing it. However, this can be tricky and might damage the grip or tape if not done carefully. It’s best to get it right the first time.
- Can I use WD-40 instead of grip solvent?
While WD-40 might act as a lubricant, it’s not recommended. Grip solvent is specifically formulated to evaporate cleanly and not leave residue that could affect the long-term bond between the grip, tape, and shaft. WD-40 can leave an oily film.
- How do I know if I’ve used enough tape for a thicker grip?
For one extra grip size, add one full wrap of tape. For two extra sizes, add two full wraps. You can experiment to find what feels best for you. Just make sure the tape is smooth and doesn’t create major ridges.
- What if the grip feels sticky after it dries?
This usually means not enough solvent was used, or the solvent hasn’t fully evaporated. If it’s just slightly tacky, it might improve with a few swings. If it’s excessively sticky, you might need to try removing and re-installing it with more solvent.
- Are there any special tools I absolutely need?
A vise with a rubber shaft clamp is essential. A utility knife or sharp blade for cutting off old grips, and a scraper for removing old tape are also very helpful. Other than that, just your new grips, tape, and solvent.
- Can I adjust the grip’s position after it’s fully dry?
No, once the solvent has evaporated and the grip has bonded, you cannot easily adjust its position without removing it entirely and starting over. This is why proper alignment during installation is so critical.
- What’s the difference between standard and midsize grips?
Standard grips are typically designed for average-sized hands. Midsize grips are larger and can be beneficial for players with larger hands or those who prefer a bit more cushioning and a thicker feel. The size difference is usually measured in fractions of an inch.
- How do I know which grip size is right for my hands?
A good starting point is to measure your hand from the heel to the tip of your middle finger. For men, a standard grip is usually around 9 to 9.5 inches. For women, it’s typically around 8.5 to 9 inches. If your measurement falls on the higher end of the range, you might consider a midsize grip.
- Can I use a heat gun instead of a hairdryer?
A heat gun is generally too hot and can easily damage graphite shafts or melt grip materials. A hairdryer on a medium setting is safer and usually sufficient if you need a little help softening an old grip.
- What if the grip feels like it’s twisting during installation?
This usually means you need more solvent. Keep adding solvent and wiggling the grip until it slides freely. Once it’s on and aligned, the solvent will evaporate and the grip will stay put.
- How do I ensure the grip is centered on the shaft?
Visually line up the grip’s logo or pattern with the shaft. You can also look down the shaft from the butt end to ensure the grip is straight. A little bit of rotation while sliding it on can help center it perfectly.
- What happens if I get solvent on the outside of the grip?
It can make the grip slippery and harder to handle during installation. Wipe off any excess solvent from the outside of the grip before you start sliding it on.
- Can I use an old piece of hose instead of grip tape?
No, this is not recommended. Grip tape is specifically designed with adhesive on both sides and the right thickness to create a consistent feel and secure bond. Using other materials can lead to poor adhesion and inconsistent grip performance.
- Is there a specific way to orient the grip for different types of shots?
For most players, aligning the grip’s logo straight up or slightly angled towards the heel is common. Some players prefer a specific orientation for fades or draws, but for general play, a neutral alignment is best.
- How do I know if I’ve applied enough tape wraps?
If you want a thicker feel, add more wraps. For a standard feel, one wrap is usually sufficient. You can always add another wrap if you feel the grip is too thin after installation.
- What’s the best way to store clubs with new grips?
Store them in a climate-controlled environment, like a garage or basement, away from extreme heat or cold. Avoid leaving them in a hot car trunk for extended periods, as this can degrade the grips over time.
- Can I use grip tape from another sport, like tennis?
While some tapes might be similar, golf grip tape is specifically designed for the

Michael Reeves is a PGA Professional with over 20 years of experience in competitive golf and instruction. A former Division I collegiate player at the University of Texas, he competed on the mini-tours before transitioning to full-time coaching and golf journalism. He has been a certified PGA teaching professional since 2005 and has worked with players at every level, from absolute beginners to collegiate champions.
His writing has appeared in Golf Digest, Golf Magazine, and The Left Rough. At GolfHubz, Michael leads the editorial team, overseeing fact-checking and ensuring every answer meets the same standard he demands on the lesson tee: clear, evidence-based, and immediately useful.
When he’s not writing or teaching, Michael plays to a +1.4 handicap at his home club in Austin, Texas. He has attended over 40 major championships as a journalist and fan, and has played more than 200 courses across 15 countries.
You can reach Michael at [email protected] or follow his occasional swing analysis posts on the site.